Using
your Dynamic Website
Kit (Revised 11/23/2016)
- Getting started
- Add
Content: Content Types
- Basic
Creating and Editing
- Add Content
- Title
- Front Page Image
- Page Body
- Summary
- Images
- CKFinder
- IMCE
- Media Embed
- Editing
- Content Options
- Book outline
- Input format
- Weight
- File
attachments
- URL path
settings
- Publishing
options
- Preview and
Save
- More
information
- Events & Programs
- Repeating Events
- Your account
- Administration
- Books
- Content
- Logout
- "Access
Denied"
message
- Custom Features
- Drop-Down
Menus
- Adding
Links
- Re-Arranging
Items
- Front Page Queue
- Photo Gallery
- Webform
Your
Dynamic Website Kit has been built for you using the
Drupal
content management system. You need to know very little about Drupal,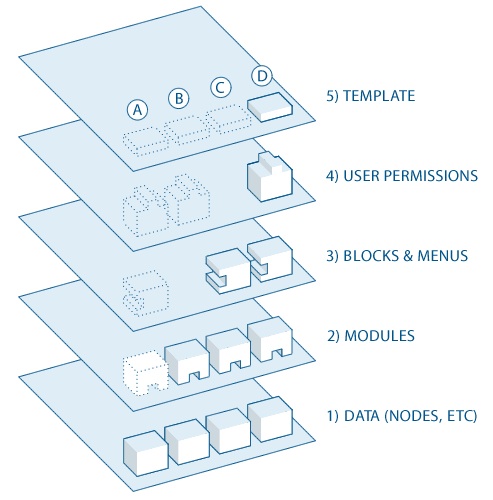 because four of the five main layers
in the Drupal system have already
been created for you by OPLIN. The last layer—the actual site
content, the words and images that people will see—will be
created
and managed by you. This is not as hard as it sounds. This simple
documentation should be all you need to get started, and OPLIN staff
are always available to help when you need it. (If you want to dig
deeper into how Drupal works, we suggest "Drupal
concepts" at http://drupal.org/node/21951.)
because four of the five main layers
in the Drupal system have already
been created for you by OPLIN. The last layer—the actual site
content, the words and images that people will see—will be
created
and managed by you. This is not as hard as it sounds. This simple
documentation should be all you need to get started, and OPLIN staff
are always available to help when you need it. (If you want to dig
deeper into how Drupal works, we suggest "Drupal
concepts" at http://drupal.org/node/21951.)
The content (data) you create will be stored in a database. While this
may seem more complicated than it needs to be, it is the feature of
your Website Kit that makes it dynamic. Traditional websites are
static, meaning the content doesn't change. You create a home page and
then you create other pages and add links to them from your home page.
For someone to find a specific page they will need to be on a page that
contains a link to that page and the only links to that page will be
ones you create. Your Website Kit, on the other hand, is dynamic,
meaning your content is stored in a database and presented to the user
when the web server receives a request from a browser. You create the
information once, and then have various possibilities on how you want
it to look, and where and when someone will or won't see it.
To
start using your Website Kit, open your web browser—any
common
browser should work—and go to the URL OPLIN gives you
(typically http://<yourlibraryURL
>/user);
enter the username
(usually "site_admin") and password OPLIN has assigned to you. Once you
login you will see
your website.
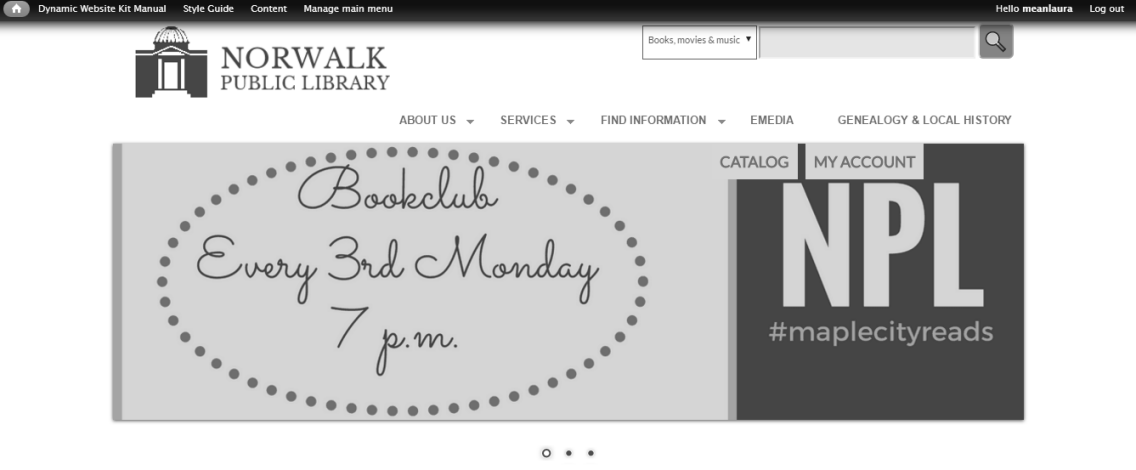
Notice,
however,
that your website now looks a little different. Across the top
you will see a menu of things you can now do on your website.
Adding
content will be the most
common task you perform on
the website, so let's start with an explanation of that task.
As you create the content for your Website Kit, you will find that not
all content is similar. Some content will be fairly static and
important. Other content may be created, changed, and removed fairly
frequently by a variety of people. Some content, like announcements of
events, will only be needed temporarily. So your Website Kit allows you
to create different types of content.
The most typical content types you will have available in your Kit are:
- Story/Article
- Articles are generally used for information items which are
only relevant for a period of time (e.g. news stories) and are expected
to expire. The most recent article will appear at the top of your
homepage, unless you manually override the placement.
- Page/Basic page
- Basic Pages are intended to be used for static content, but
they
are not a part of any content hierarchy and must be manually linked
from another page in order to access them. One possible example would
be a page of levy campaign information that's not related to any other
pages.
- Book page
- Book Pages are designed to be part of a
collaborative "book," a set of pages tied together in a hierarchy, just
as chapters and parts of books are organized in a hierarchy. At the
bottom of book pages, your Website Kit will automatically provide links
for moving to the previous page and the next, and a link labeled "up"
that leads to the level above in the structure. A contents page is also
automatically created.
- Events & Programs
- An Event is basically a Story that includes a start and end
date, and will only appear on your website between those dates. Events
automatically appear in the events calendar.
Other types of content may also be available in your Kit, depending on
the custom options you requested from OPLIN. Some of the most common
include:
Nivo Slider
Nivo
Sliders are images that appear in the rotating banner (carousel) that
appears on the home pages of some Website Kits. These images can be
linked to any internal or external URL.
Photo
Photographs uploaded into photo galleries.
Webform
Webforms
are web forms created for people to fill out online and the results are
emailed to specfied email addresses. OPLIN can build individual forms
for your library's site, or your
library can
purchase the Webform module to build its own, basic forms. Forms built
by OPLIN are not editable by the the client library; changes must be
made through OPLIN.
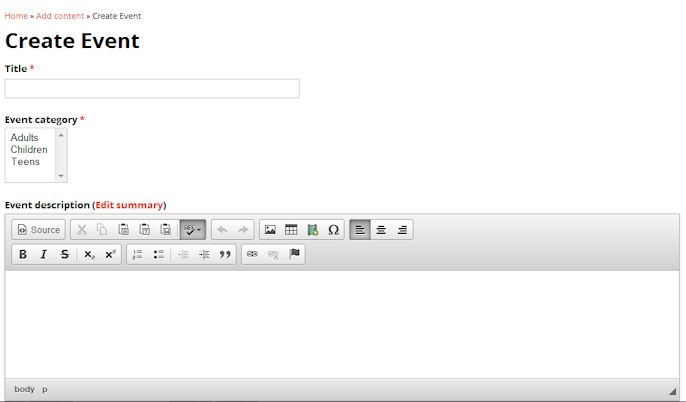
Add
Content
To
create a new page, click on the "Content" link on your administrative
toolbar. You will see a list of the types of content you can
create. (This list will depend on the content types which OPLIN has set
up for you.)
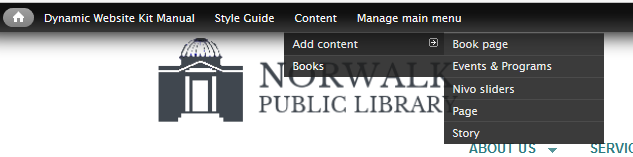
Click
on the type of content you wish to create and you get a
blank creation template.

The
Title is required. The Title is what will normally show in the menus
that provide access to this page, so make it short but descriptive. And
don't use
exclamation points in your title. (For more information about
why you should not use exclamation points on your website, see the
Website Kit Style Guide--"Writing
for the Web.") Also, if your site uses the "Story Block"
layout, you will need to insure that your title's length is not too
long or it will wrap to a second line and cause display issues.
Front
Page Image (Story Block layout only)
The
Front Page Image appears only in the Story/Article content type, and is
required. Images may be in either JPG, JPEG, GIF or PNG format.
Remember to optimize your images (using a tool such as
http://www.compressor.io).
The specific size of the images will be
provided to you by OPLIN and will sometimes vary from Kit to Kit. Be
sure to fill out the "Alternative Text" field that appears, or your
site immediately ranks as inaccessible to those using screen reading
software, such as people who are blind or visually impaired.
Let's
look now at the "Body" section of this page, which is where you will
actually create your content. You will write things in the
body using a rich-text editor that looks very much like Microsoft Word.
Don't be tempted, however, to
create complex pages in Word and paste them into this editor. Word
documents contain a lot of hidden formatting code that will not
translate well. You can paste portions of simple Word documents, or
other text with hidden formatting such as text from your old website,
into
the editor using the Word icon at the top of the editor— —but
it is generally better to either work directly in the rich-text editor
or
paste from a simple text editor like Notepad. If you must have a very
specific page layout, perhaps for a newsletter, it is often best to
just
attach a standard pdf document to a simple, short Book Page. (We'll
talk more about file
attachments later in this document.)
—but
it is generally better to either work directly in the rich-text editor
or
paste from a simple text editor like Notepad. If you must have a very
specific page layout, perhaps for a newsletter, it is often best to
just
attach a standard pdf document to a simple, short Book Page. (We'll
talk more about file
attachments later in this document.)
Remember
that your page will be displayed on the Web, which requires that you
consider a few conventions that differ from traditional print
documents. For instance, underlining in an online document is very
confusing for the reader, since links are underlined. Because
of this, the editor does not include an "underline" option at
all. Also note that it
is best not to use the plain text editor
option or the source button-- -- for
creating content, unless you are very familiar with standards-compliant
HTML or XHTML coding
and want to achieve some special formatting that is not available in
the rich text editor.
-- for
creating content, unless you are very familiar with standards-compliant
HTML or XHTML coding
and want to achieve some special formatting that is not available in
the rich text editor.
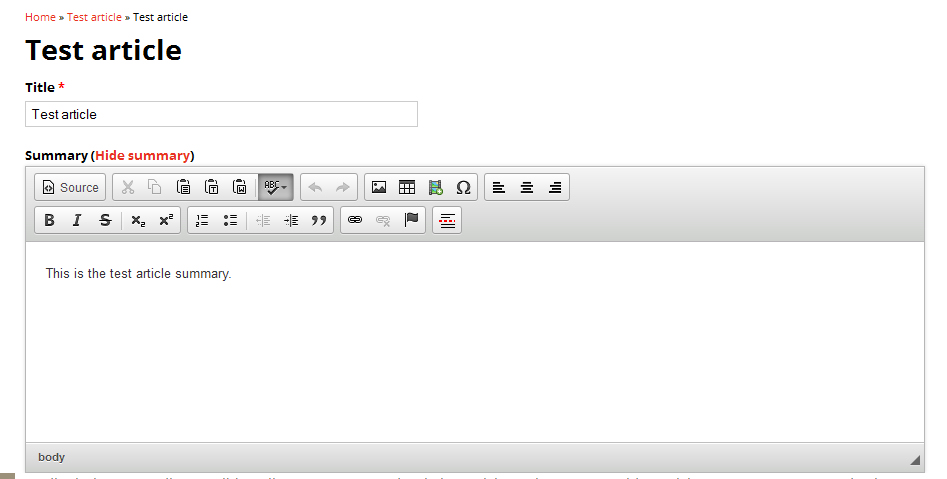
Summary
(Teaser)
NOTE: Trimming does not apply to
Website Kit layouts that use Story/Article Blocks.
Large
chunks of text should not appear on your library's homepage; it's very
poor practice and will actively turn off users. To learn more about why
large
amounts of text create poor usability for your site's users, see http://oplin.org/sites/default/files/webkit_style_guide.html#writing.
There
are two different ways that you can control the amount of text that
appears on your site's homepage.
METHOD
ONE: When a
page is
published on your site, a trimmed version is also published, a "teaser"
that usually includes the first 500 or 600 characters of your page
followed by a "read more" link to the full version. This trimmed
version is used if you place your Event or Story/Story on your
website's
front page and will also appear in RSS feeds from your site. To control
exactly what is included in the trimmed version, rather than cutting it
off after a certain number of characters, go to the point in your text
where you want the teaser to end and click on the "Teaser" button in
the text editor's toolbar.
A
double line will appear at this point in the text in the
editor window, but it won't show up on your finished web page.
METHOD
TWO: This second method allows for a great deal more control
over what
appears on the homepage; rather than cutting off the content after a To
control
exactly what is included in the summary, rather than cutting it
off after a certain number of characters, click on "Edit summary" and
the text box for the writing the summary will replace Body
text box. Click "Hide summary" to return to the full text of the
article. Note that, if anything is placed in the "Edit
Summary" field,
that will automatically replace any other teaser breaks in the body.
For
more detailed help with using the editor to write your
page content, see the CKEditor Users
Guide.
One
other icon that will be unfamiliar, but important, is the image
icon— .
Click this
icon to insert an image into your content. If you want to use
an image that is not already available to you on your site's server,
you will need to upload it. Note: don't try to
upload images from a digital camera before first optimizing them for
the web, they're much too big (size limit is 2MB); webresizer.com
works
well. A window will pop up
asking
for information about the image.
.
Click this
icon to insert an image into your content. If you want to use
an image that is not already available to you on your site's server,
you will need to upload it. Note: don't try to
upload images from a digital camera before first optimizing them for
the web, they're much too big (size limit is 2MB); webresizer.com
works
well. A window will pop up
asking
for information about the image.
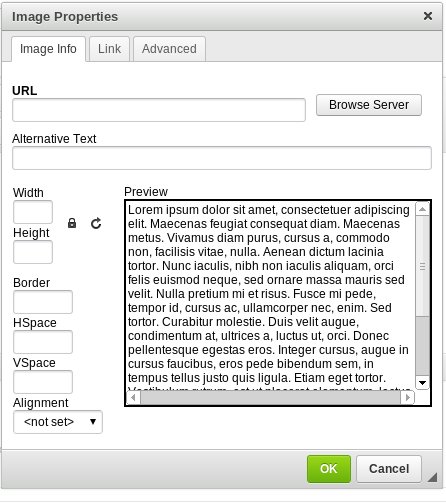
- URL
- Defines the URL address of the image. You may also use
the "Browse Server" button in order to browse the files.
- Alternative Text
- Short text that serves the same purpose and presents the
same
information as the image. Primarily used by
assistive technology devices, so should conform to the W3C Web
Content Accessibility Guidelines 2.0. For a discussion of
best
practices, see http://www.w3.org/TR/2010/NOTE-WCAG20-TECHS-20101014/G94. Be
sure to fill out the "Alternative Text" field that appears, or your
site immediately ranks as inaccessible to those using screen reading
software, such as people who are blind or visually impaired. TREAT THIS
AS A REQUIRED FIELD.
- Width
- Specifies image width. This field will
generally auto-fill when an image is chosen; however,
for most images to be responsive (resize for smaller screens), you will
need to delete any entry in this field.
- Height
- Specifies image height. You may lock the image
proportions by clicking the image of
the lock, or you can
return to the original image size by clicking on the circular
arrow. his field will generally auto-fill when an image is
chosen; however,
for most images to be responsive (resize for smaller screens), you will
need to delete any entry in this field.
- Border
- Specifies the thickness of the border you want to place
around the
image.
- HSpace
- Defines the size of the horizontal gap surrounding the
image. If you don't want text squished up right next to an
image, this adds white space horizontally.
- VSpace
- Defines the size of the vertical gap. If
you don't want text squished up right next to an image, this adds white
space vertictally.
- Align
- Specifies the alignment of the image. You can choose from
Left or
Right.
-
- "Left" aligns the image with the left margin of the
page
and allows text to wrap around the right side of the image.
- "Right" aligns the image with the right margin of the
page
and allows the text to wrap around the left side of the image.
Notice
the "Link" tab
on the Image Properties window; this tab allows you to make your image
into a link to another page.
Learn
more about using graphics
on websites at http://oplin.org/sites/default/files/webkit_style_guide.html#graphics.
Now
notice the "Browse server" button; this button
allows you to save and retrieve images (or other files) on the server
for use on multiple pages. Clicking the "Browse server" button lets you
look through all the images that have been saved on the website server
and select one or more to insert on your page. To upload more
than one
image, hold down the CTRL key while clicking on the image names. You must upload images
to the web server in order for them to be visible to other people,
besides yourself. Click
the "Browse server" button and a
window will pop up. The OPLIN Dynamic Website Kits currently use two
different image uploaders, so be sure to see the directions for the one
your site uses.
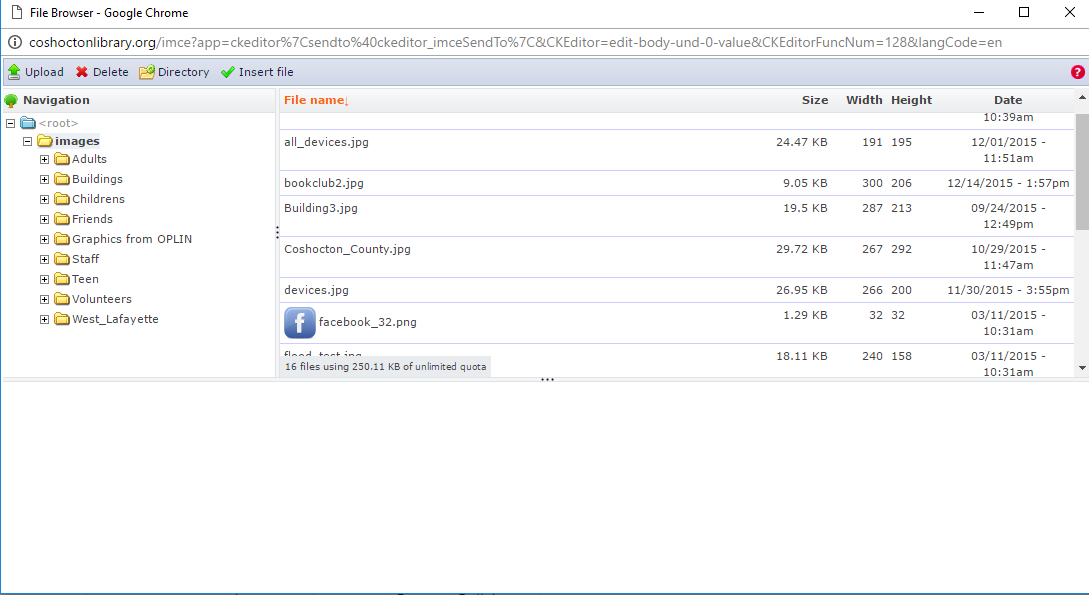
CKFinder
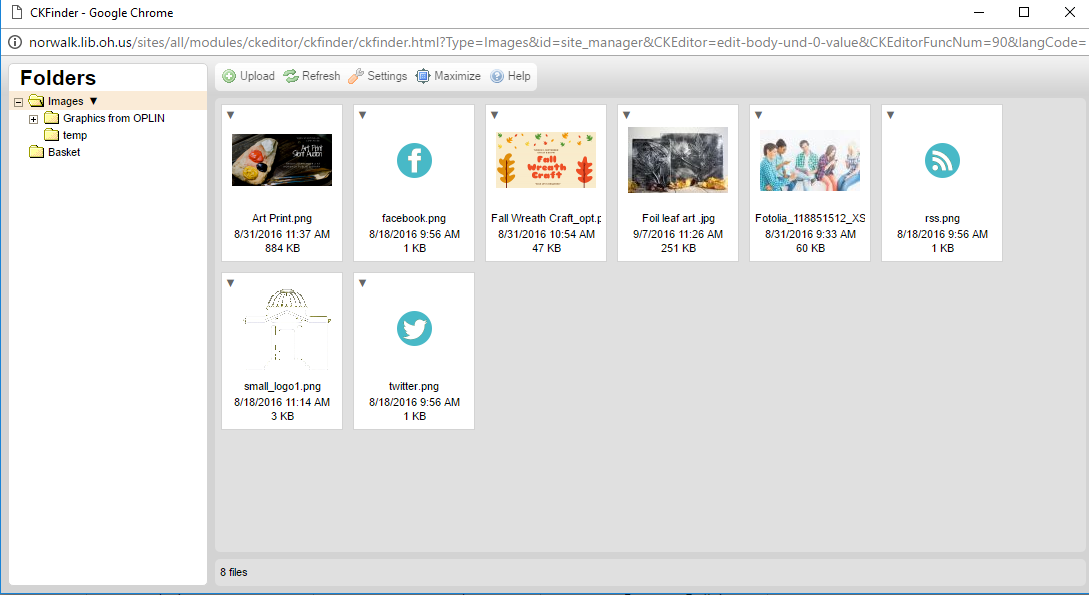
This
window is divided into four areas, the most important being the
toolbar across the top and the files pane right below the toolbar.
- Click the "Upload" button in the toolbar and then "Add
Files" in
the new pane that opens. You can add as many files as you want.
- Click the "Upload" button right below "Add Files" to upload
the
entire queue (2MB limit for each file).
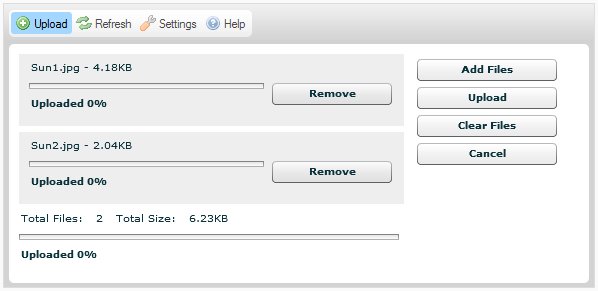
- Your uploaded files will appear now in the files pane. Right-click
any file in this pane and choose "Download." It will
appear now in the
original window where you saw the "Browse server" button, and you can
format it as needed.
- You can create new sub-folders by right-clicking on the
"Images" directory in the left panel. CAUTION: If you move
an image into a directory after
it was uploaded and inserted into any content, the link to that image
from that content will be broken. Be sure to upload images directly
into the directory you want it to reside it.
For
information about other tasks you can perform from this window,
please see the CKFinder Users
Guide.
IMCE
- Click the "Upload" button in the toolbar and then "Choose
File" to navigate to the file you need to upload.
- Click the "Upload" button right below "Add Files" to upload
the image (2MB limit for each file).
- Once
uploaded, the image's name will show up in the right panel. Click
"Insert" to put that image into the content you're working on.
- Note that you can create new directories to sort your files
by using the "Directory" button. CAUTION:
If you move an image into a directory after
it was uploaded and inserted into any content, the link to that image
from that content will be broken. Be sure to upload images directly
into the directory you want it to reside it.
Note:
OPLIN does
provide some high-quality clip art images for your use, and these are
added to periodically. These are contained in a folder you
will see called "Graphics from OPLIN." This directory can be found in
the image library for all Website Kits, regardless of which image
uploader is used.
Learn
more about using graphics
on websites at http://oplin.org/sites/default/files/webkit_style_guide.html#graphics.
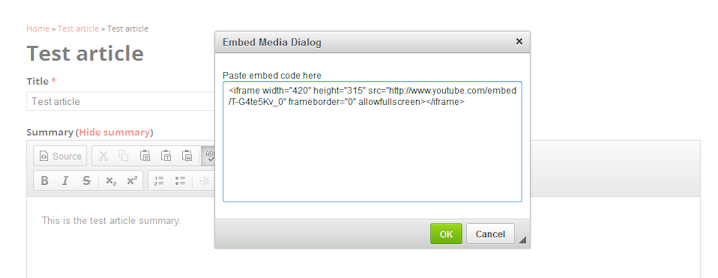
Media Embed
The
editor also gives you the
ability to embed videos, from such services as YouTube or Vimeo,
directlly in your content. Click the Media Embed button-- --to insert the code generated by
such
sites for embedding. Then click "OK." When you ge to these video sites,
be sure to get the "embed" code and not just the URL of the video.
--to insert the code generated by
such
sites for embedding. Then click "OK." When you ge to these video sites,
be sure to get the "embed" code and not just the URL of the video.
Editing
a page is
very similar to creating a page, except that you start by navigating
through your site to the page you want to edit. Since you are logged in
and able to edit content, you will see a tab at the top of your page
that allows you to edit the page. (Note:
the "Outline" tab is a shortcut that will allow you to assign the page
to a
book hierarchy or modify its weight,
which will be discussed a little later. The "Track" tab shows a history
of changes to the page.)

Once
you click on "Edit," you will see a screen that has many features
similar to
the content creation screen, and behaves similarly. Note
that, if you are editing content that has a summary, the summary will
appear first, by default. The regular content will
appear beneath
the summary field.
Let's
look now at all the options that are available on this screen for
managing your page content.
Whether editing or creating content, there are options which can be set
that control how and where a page will be displayed to visitors to your
website. Below is an explanation of some of the most important options.
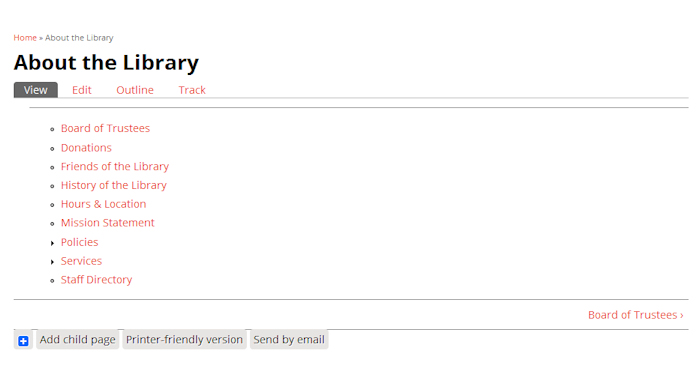
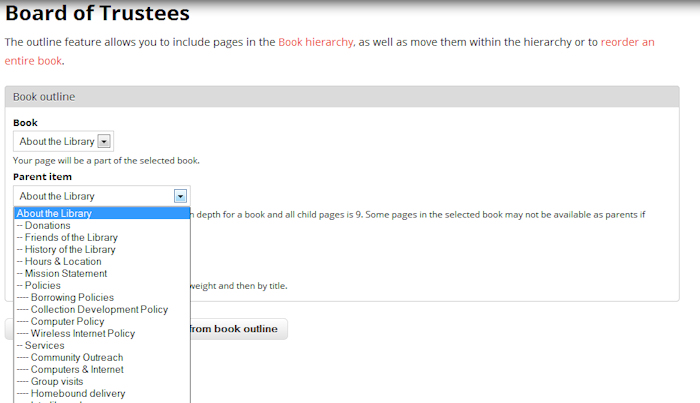
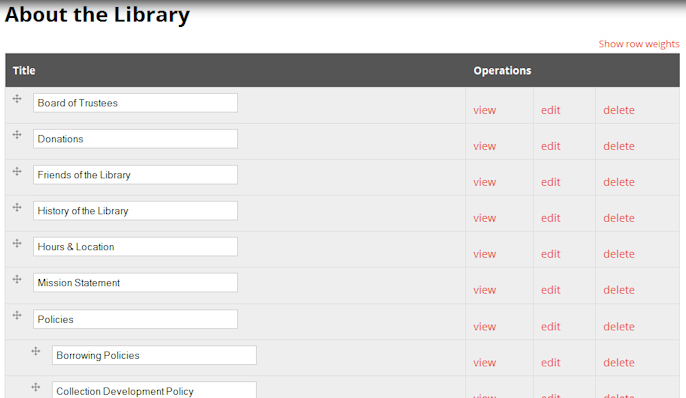
This
option is required if you are working with Book Pages; it
allows you to create and organize multi-level menus that
collapse and expand. For example, in the image of the About Us page
below,, the Parent item is "About the Library" (and it is a top-level
page, meaning it has no Parent), while
"Board of
Trustees," "Donations," "Friends of the Library," and so forth are
all "child" items of the Parent "About the Library."
You
can move
the location of a Book Page by changing the options in the Book Outline
tab. You can change the parent item, or even put the Book
Page in another book entirely.
When
you have
moved the Book Page (changed the Book and/or the Parent), be sure to
click the "Update book outline" button. Note that you can
also transform a Book Page to a Basic Page, by clicking the "Remove
from book outline" button. (Basic Pages will be discussed
later in this document.)
If
you see this, DO NOT
change it! This has been set by OPLIN. It is only used in
very select cases, working directly with OPLIN staff.
This
option is found under "Book
outline." It allows
you to set a relative position within the
menu: an item with a heavier "weight" (higher number) will appear below
an item with a lower weight. (If all items have the same weight, they
will display in alphabetical order on the menu.) In other
words, items with weights of negative numbers will appear higher in a
list than those with positive numbers.
This
option allows you to browse your computer and attach a
PDF file to your page. The maximum file size is 2Mb, which is about the
largest file you should expect your users to be able to comfortably
download. If you wish, you can (and probably should) change
the name of the file if
you want to use a name that makes more sense to your website visitors.
The text
you type in the "Description" field will become the name of the file
seen by users.
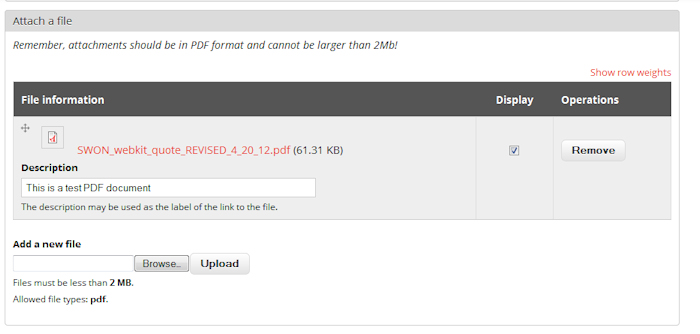
If
the
"Display" option is checked, the file name will also
appear on the bottom of your page for visitors to download. If you
attach more than one file, you can use the drag-and-drop icon
to the left of
the file name to move files up or down in the list.
A
"normal" Drupal page will have a URL like
http://drupal.org/node/21951—not very handy for verbally
telling
people how to get to the page or remembering a page address. Your
Website Kit is set to automatically rename your pages using your page
title, so you will have URLs like
http://www.mylibrary.org/content/board_information.
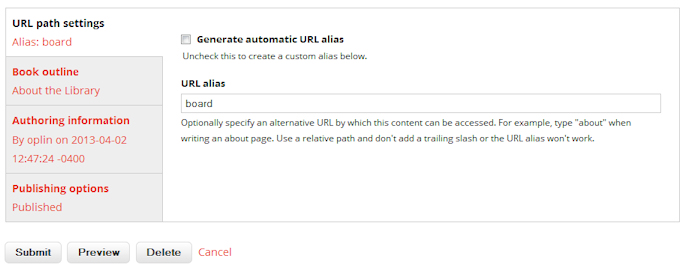
If
you
want to use something different in the
URL, uncheck the "Automatic alias" box and enter your preferred alias.
In the example above, for example, the URL will
be http://www.mylibrary.org/board. WARNING: When linking to
something inside your website, use a relative URL, not an absolutel
URL.
These
options control if and when your content will be visible
on your website. You rarely delete content once you have created it;
instead, you just unpublish it and it will not be visible to visitors.
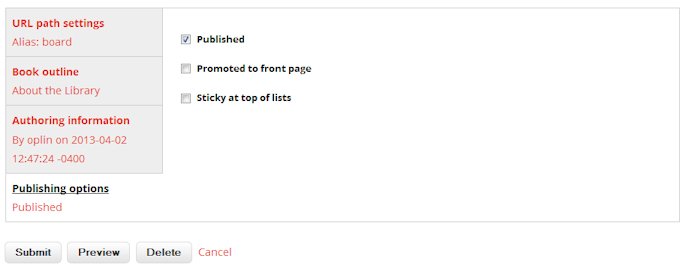
If
the
"Published" box is checked when you submit the item after
you've completed it, then the item will be visible to visitors to your
website; if you want to hide the page and publish it later, after you
have done more work on it, for example, then uncheck
this box.
If you
check "Promoted to front page," your item will appear on your
website's home page as well as in the menu you specified. "Sticky at
top of lists" keeps a news item at the top of your home page, instead
of placing newer news items above it. Use this option with
moderation! If you make more than one item sticky, your sticky items
will appear with the newest sticky item at the top. (NOTE: These two options do not
apply to "Story Block" layouts.)
Tip:
If you really want more than one sticky item, then you can control the
order of the stickies with this trick: go to the "Authoring
information" option and manually change the authoring date to make your
top sticky item "newer" than the others. (NOTE:
This option does not apply to "Story Block" layouts.)
Once
you are finished working on
an item, it is a good idea to
click on the "Preview" button at the bottom of the page to be sure it
looks as you expected. If not, you are able to edit the content from
the bottom of the preview page. When you are satisfied that everything
is OK, click on "Submit." Nothing will be saved until you choose
"Submit."
If you want to save the page as a draft, or work on it with
others, just remember to unpublish it before you submit it.
If
you want to discard all of
your unsaved work and start
over, click on "Cancel." Once a page has
been saved, a "Delete" button will appear at the bottom of the
editing view if you want to completely remove the page from your server.
Other
options are probably
self-explanatory. If you need
more assistance than the on-screen hints, or would just like to see a
different explanation of how all these options work, we suggest Caign
Web's Drupal guide at
http://www.caignwebs.com.au/drupal-user-guide/default-content-management-facilities.
(Note that their Drupal configurations are going to be somewhat
different, but the concepts are generally the same.) You can
also just call OPLIN Support at 1-888-966-7546, or email support@oplin.org,
or chat with us at http://support.oplin.org.
As
a
library, one of the most common information items you create for your
page will be event announcements. The next several upcoming events
usually
appear on the home page, where they
will be most visible to visitors, and all upcoming events will
automatically appear on your Events Calendar. The creation of Events
differs from
Book Pages (and Stories) in some significant ways.
When
you create or edit an Event, what you see at first is very similar to
what you would normally see
when creating a Book Page, except there are several choices to make
before you get to the "Body" box for writing text :
Items
followed by a red asterisk
are required. The title is, of
course, the name of your event.
You
must also choose an Event
Category and an Event Location (the latter usually
only if your library has more than one location) from the
lists provided. The items in these lists were previously defined by
your library's staff, but you can contact OPLIN to add/delete/change
these at any time.
The
"From date" and "To date"
fields
set the beginning and ending date and time for the event. A week-long
festival, for example, would cover several days, while most events will
only cover a few hours.
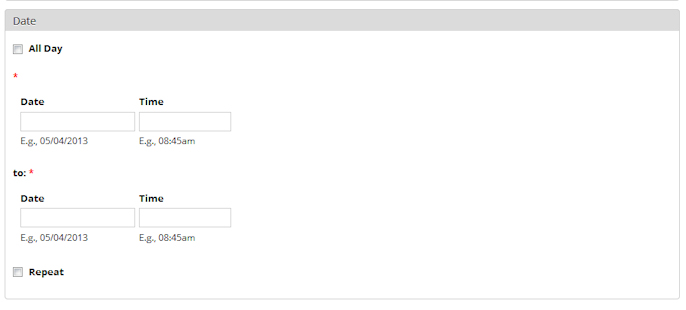
If
the event repeats, click on
the "Repeat" checkbox to
open that menu:
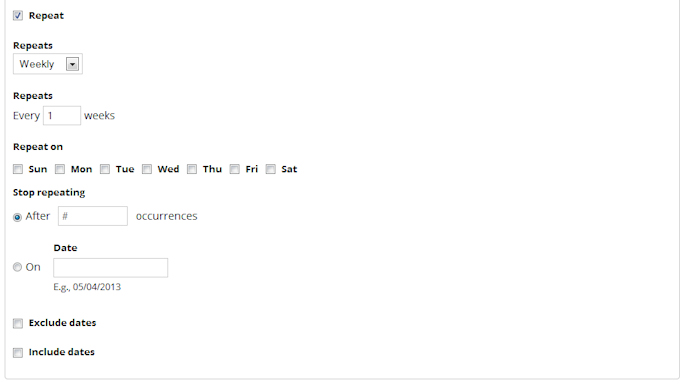
Note
that, for a repeating event
to work properly, you will need to fill out both the start and end date
for the first instance. For example:
your library
has a program that goes for six weeks, beginning on June 1st.
You will need to set the start and end dates both to June
1st, then
create the repeat pattern.
The
"Exclude dates" and "Include
dates"
boxes allow you to remove or add specific dates to the pattern.
This is especially helpful if a program, say, doesn't happen
on a holiday in the middle of a set pattern of dates. You can
also add on dates if you want to extend an existing program.
Once
you have defined your Event,
be sure to save it as you would
any other content.
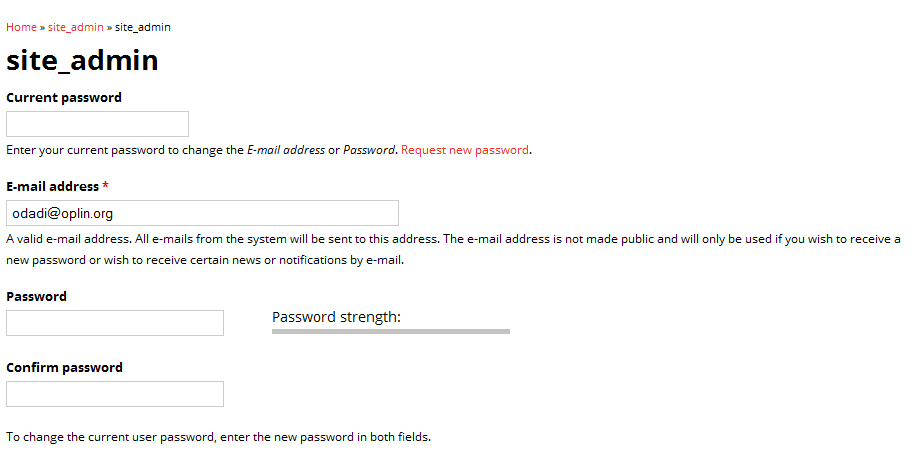
To
change the email address or
password associated with your account, click your username
("site_admin") on the top right of the administrative toolbar.
You will have the
option of changing some of your account parameters under the "Edit" tab.
Multiple
people can use
the same account at the same time, so one account is usually
sufficient. If you wish, OPLIN can
create new, specific accounts for you that only have permission to
create certain content types (e.g., Events).
There
are several other links on
the administrative toolbar that
allow
you to perform some administration tasks on your site. Let's look at
some of the more important
administration tasks.
The
Books option
("Content"-->"Books") gives you a tool for quickly changing the
structure of an entire "Book" from your site, without the need to
individually edit Book Pages.
As
you can see, this is a clear
depiction of the hierarchy of
the
Book Pages within the Book. You can edit or delete Book Pages directly
from this menu, and you can also change the order of the Book Pages by
using the drag-and-drop icons to the left of each title.
Perhaps
the most useful item on
the administrative toolbar is the
link to Content. This gives you "control panel" access to all the
content
in your website.
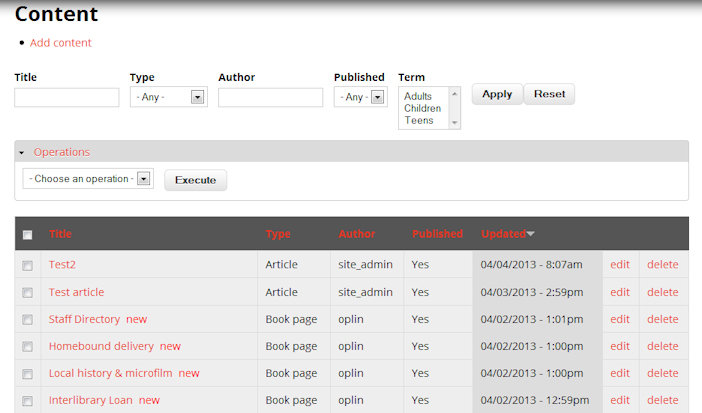
By
using the pull-down menus at
the top of the page, you can
see and modify all the content in your site, including unpublished
content. You can also select a number of content items and transform
them all at once by using the "Operations" pull-down menu. Your
options here are to publish/unpublish, promote/demote to front page,
add or remove stickiness, or delete. This can be very handy, or very
dangerous; be careful!
Remember
to logout when you are done (at the top right of the
administrative toolbar); the next person to use your computer will have
access to your content if you don't logout. After you logout you will
be returned to the normal view of your website, without the "Edit"
button at the top of the pages.
"Access Denied"
The
most common issue reported to
OPLIN is seeing an "Access Denied" message. However, this
message is very misleading: if you enter the incorrect
password or username, you actually will receive a very different
message. The "Access Denied" message actually means that you
(or someone else on the same computer) did not logout of the website
the last time. The browser now believes that you are
attempting to open a new session, when session cookies for an existing
session still exist. In order to clear the problem, you will
need to clear the cookies from your browser. To prevent this
issue, always be sure to click the "Logout" option on the
administrative toolbar when you're finished.
Custom Features
Drop-Down
Menus
- Only
have the specified number of top-level options across the top. Your site is designed to
handle a specific number, which OPLIN will tell you. Adding or
decreasing may cause your menu to display improperly. If you need to change the
total number of top-level navigation labels, please contact OPLIN
directly.
- Not
more than 3 levels of navigation.
Deeper than this will cause usability or display
issues. (This means
the top level, plus two sub-levels.)
- Your
items should echo the hierarchy of your book pages. This is
especially important, because otherwise your users will likely be
confused when they go to a book page and see the list of available
options there--if it doesn't match the drop-down options, that's a
usability issue. So, yes--if you add a new book page, you'll want to
add it to your drop-down menu. If you delete a book page, you’ll need
to remove it from your drop-down menu.
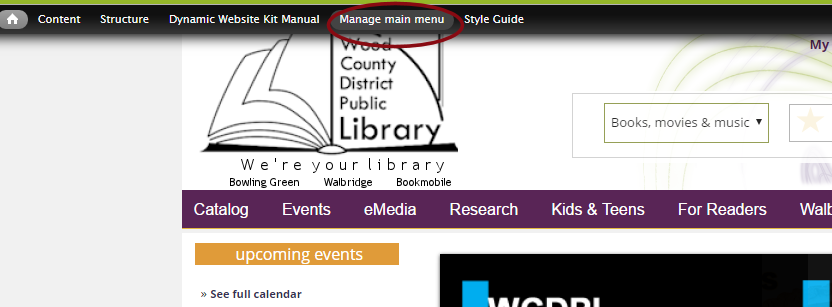
How
to add links to the drop-down menus:
- Click
"Manage main menu"
on the administrative bar.
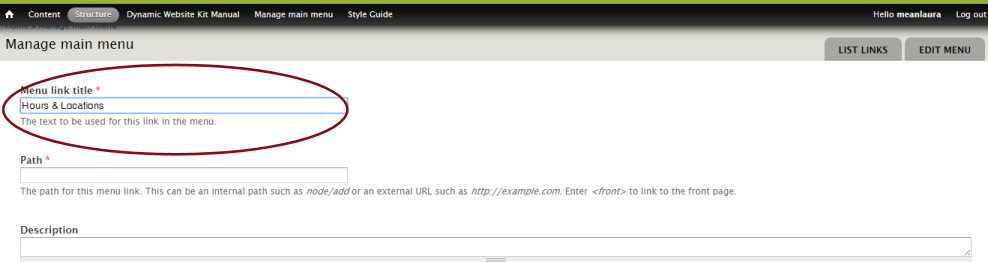
2. Click "Add
link" at the top of the screen.
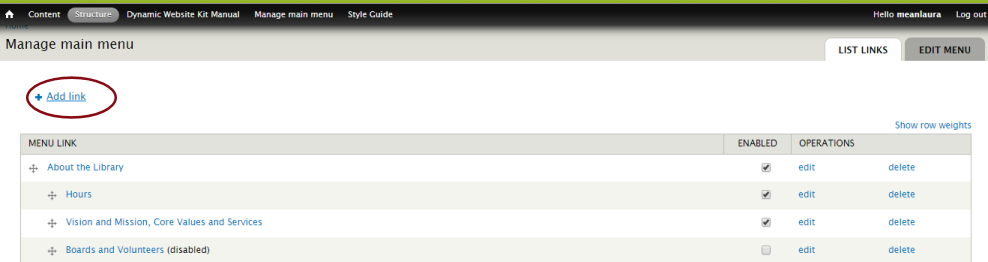
3. Put in the title
of the link (such as "Hours & Locations").
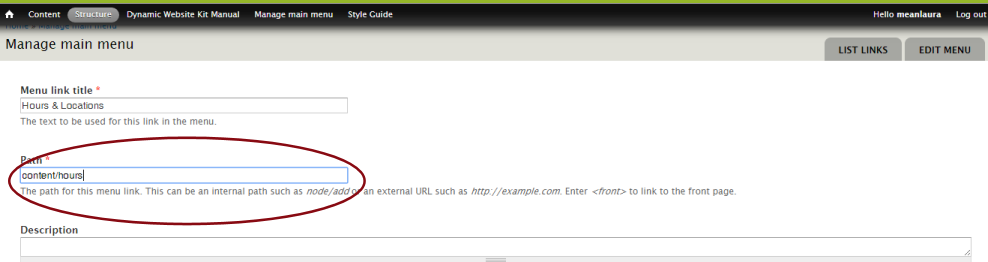
4.
Put in the path of the
link. If it is
an external link (something NOT on your site, like your catalog), put
in the
full link (absolute URL). If
it is another
page on your site,
put in a relative URL (such as "about" or
"content/outreach"). NOTE:
Relative URLs should not have a forward-leaning slash in front of the
page. We do not
recommend putting full,
absolute URLs to internal links.
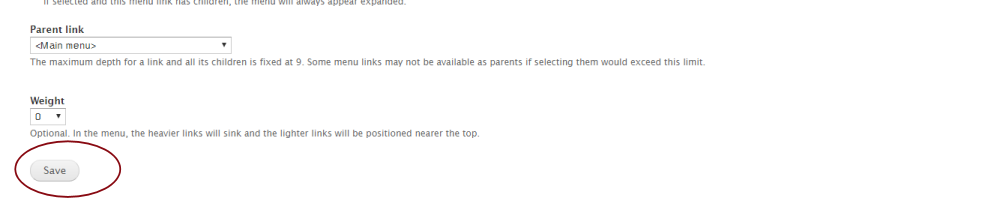
5.
Ignore all other fields (really!) and click "Save"
at the bottom of the page.
However,
if you'd like, you can
use the "Parent Link" field to place your link into the drop-down
hierarchy in the correct place.
Otherwise, you can use the
drag-and-drop interface, in the next step, to do
this. Either way will work.
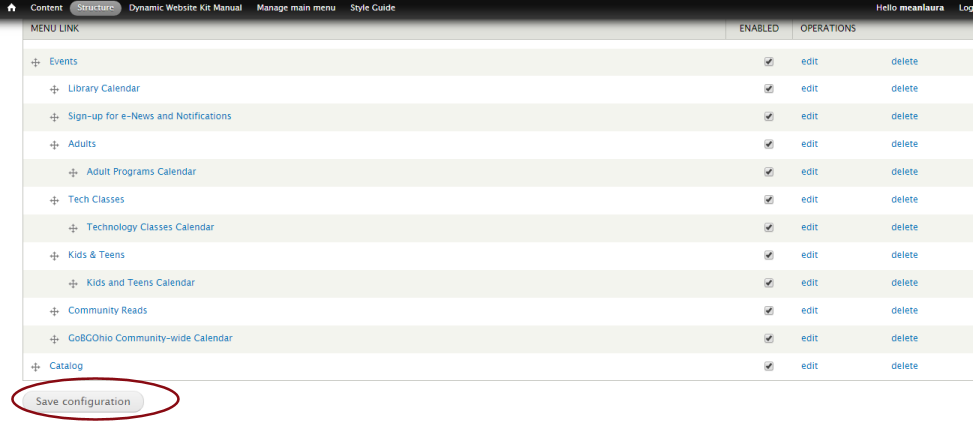
How
to re-arrange the order and level of items:
1. All
menu items, regardless of level, have a
drag-and-drop handle to the left.
Simply drag items into the order/level you'd like.

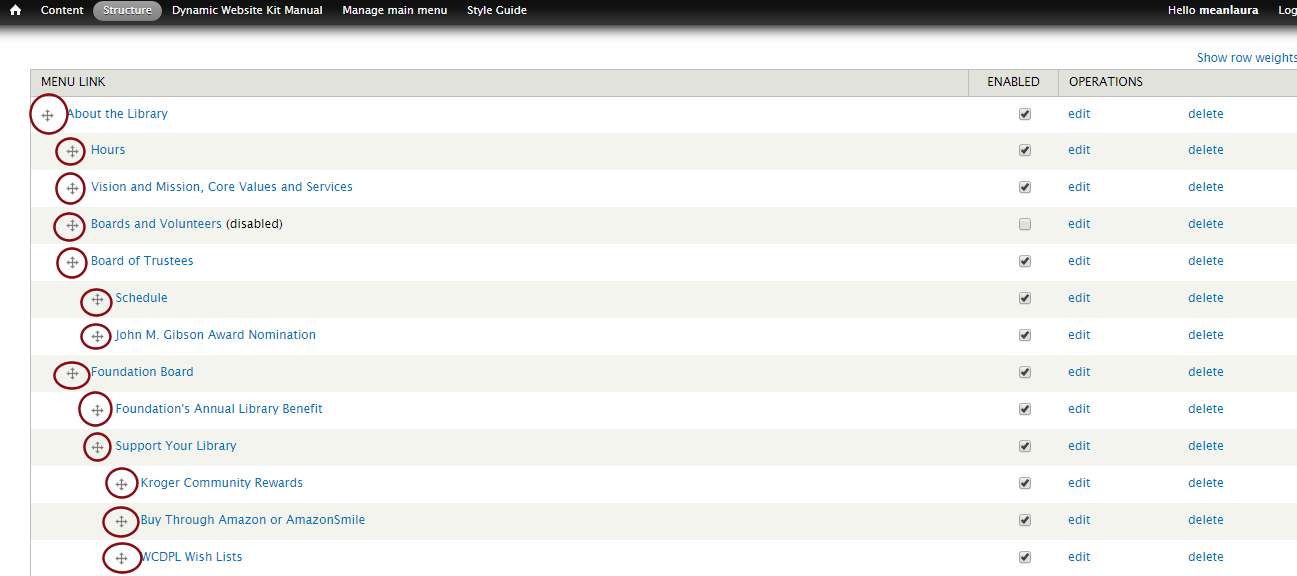
2. When you're satisfied,
click "Save configuration" at the
bottom
of the page.
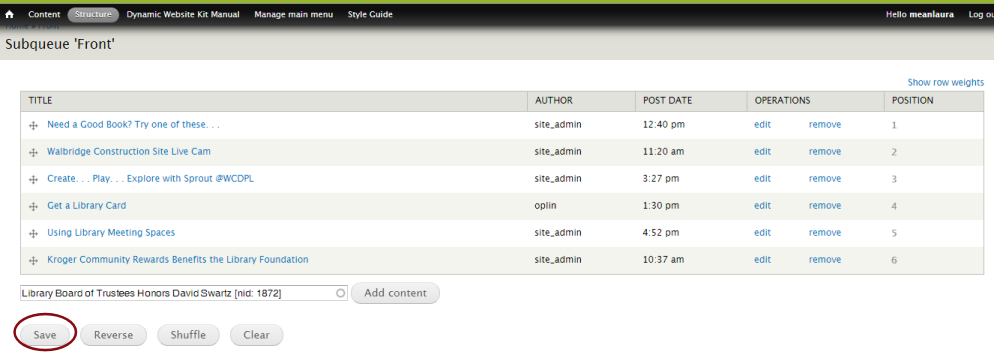
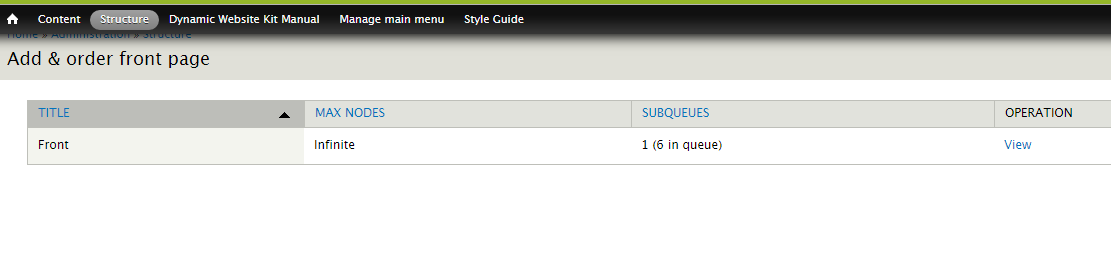
Front Page Queue
- Go to "Add
& order front page."
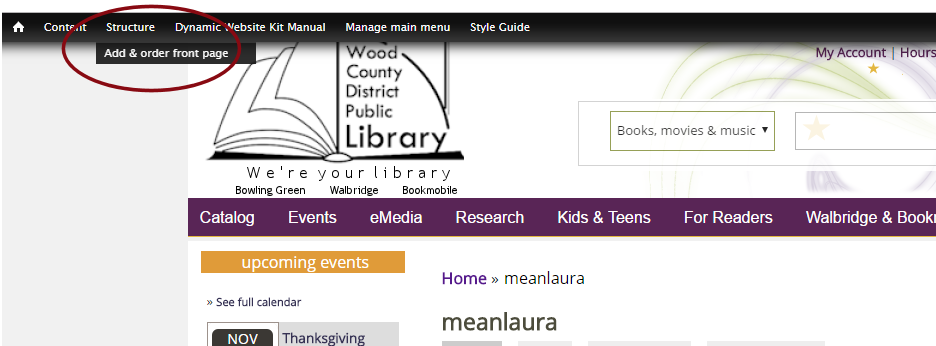
2. Choose "View" on the next
screen.
3. You
can drag the items on the front page into the order you want using each
item's drag-and-drop
handle to the left.
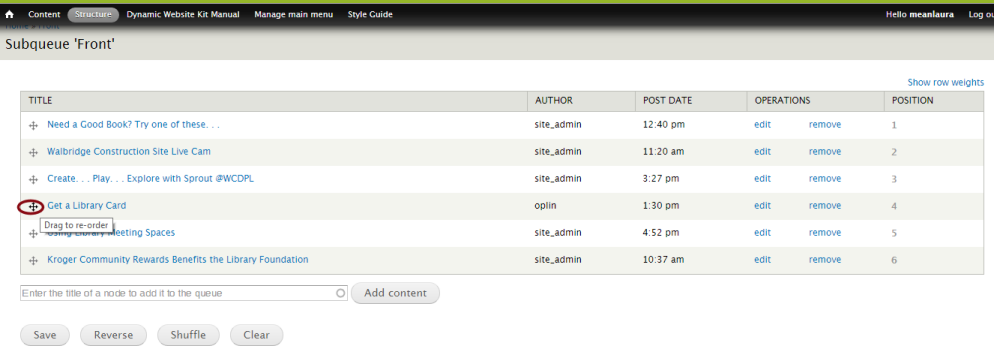
4. Add
new items to the front page using the "Add content" field.
Type in the beginning. of the item's title, and autofill will
bring up any possible matches. Choose the one you need, then click "Add content."
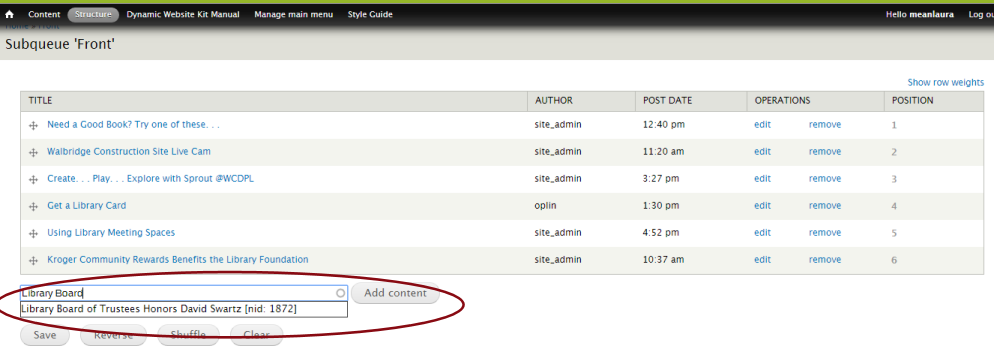
5. Be
sure to click "Save," or your changes will not take effect!
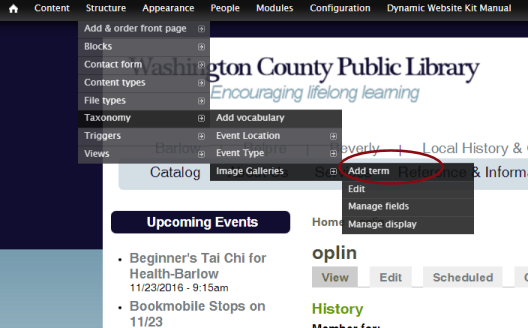
Photo Gallery
1.
Create
gallery for photos to go into: Go to
Structure > Taxonomy
> Image Galleries >
Add Term.
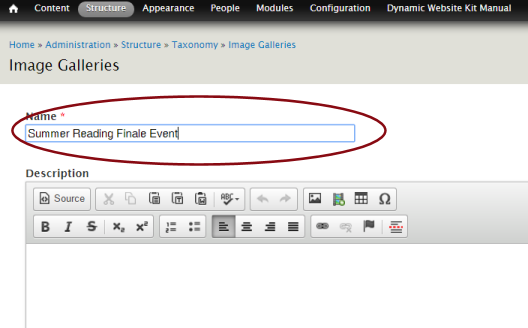
2.
Add a new
gallery. You only need to fill in the
“Name” field. No other fields are needed. Click “Save” at the bottom.
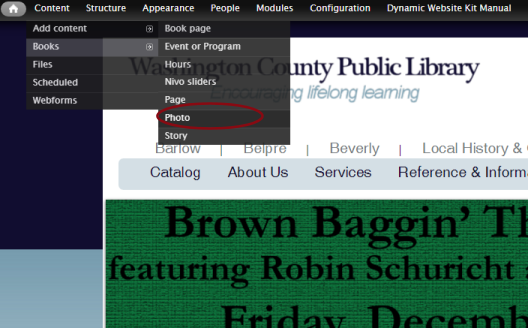
3.
Now add
photos: Go to
Content > Add Content
> Photos.
4. Fill
in the necessary information and upload the photo.
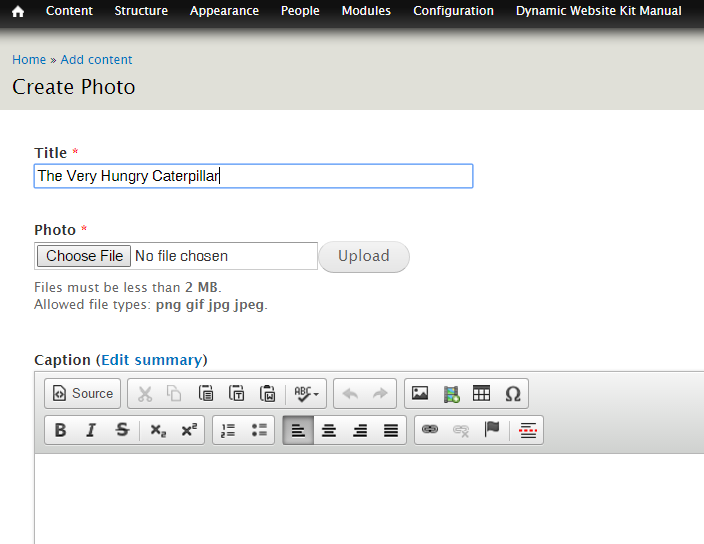
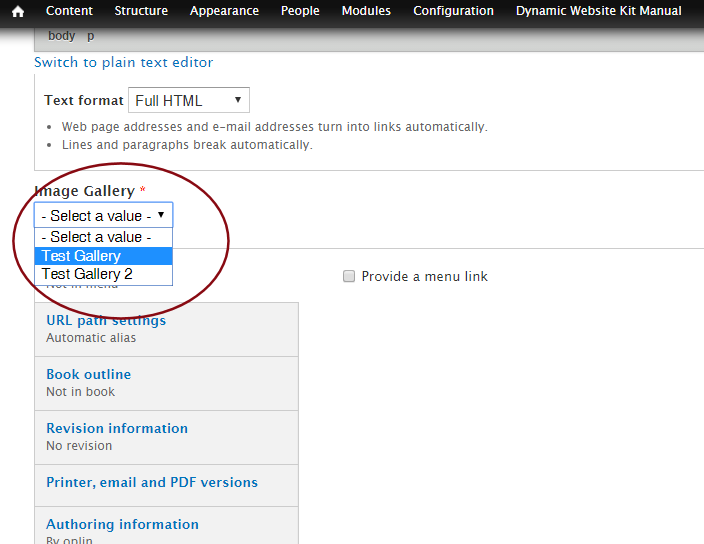
5. Assign
the photo to a specific gallery. Then click “Submit.” That’s it!
WebformThe
Webform module allows you to create simple online forms. Note that
forms created by OPLIN are not accessible for editing, even if you have
this module installed to your library's Website Kit.
Because
of the complexity of the Webform module, OPLIN has created a series of
YouTube videos for instructional purposes. You can find them here: https://www.youtube.com/watch?v=Tldf_rPxtGw&list=PLP3tiL6bDbfZNm1v3PcxpPyCVLwMrp91Y